
It can be really annoying if your Android phone gets stuck in recovery mode. With a broken power button, you can’t actually do much. However, this doesn’t mean that getting a new phone is the only solution.
You can get your phone out of the loop of recovery mode using a PC. All you need to do is execute some commands to reboot the phone.
I know it sounds like a lot of nerdy stuff, but trust me, you don’t have to be an expert to do all this. Just be patient and navigate through the steps discussed in this article.
If you do, you won’t have any issues rescuing your Android device from recovery mode even if the power button is broken.
Why Does Android OS Go Into Recovery Mode?
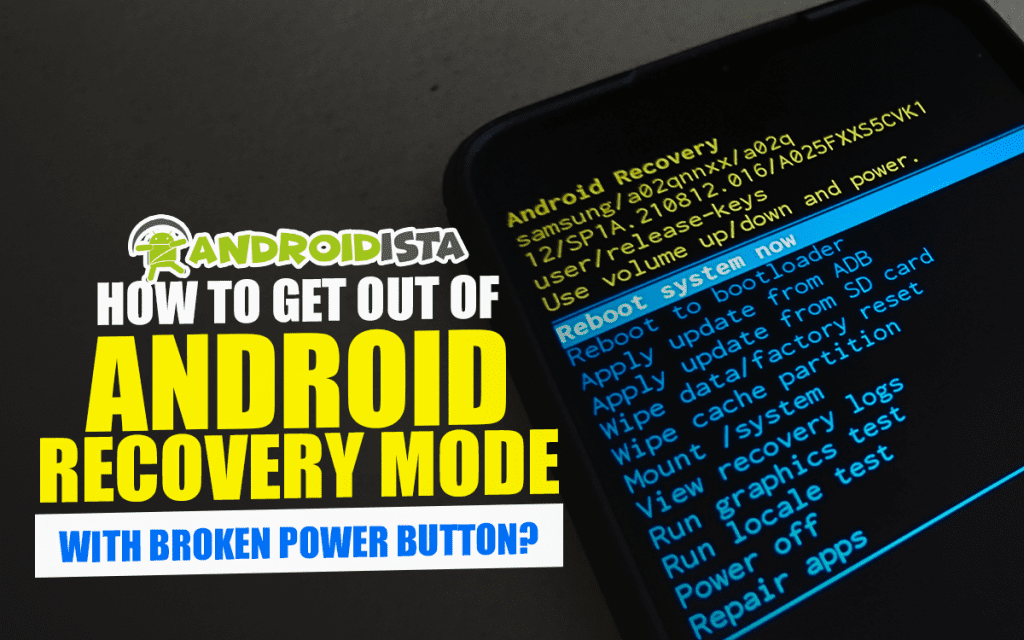
As you probably know, recovery mode is basically a special diagnostic mode of the Android OS. This mode allows your phone to troubleshoot and fix issues with the device. If the phone is in recovery mode, it can mean that the OS is not loading correctly. However, it can also indicate issues that the hardware may have. Here are a few very common reasons why Android OS is likely to go into recovery mode:
Your Android Smartphone Ran into Software Issues
You never know what might ruin the system of your Android. Although Android OS is not vulnerable by any means, it are not perfect.
Usually, an external issue like a virus may corrupt the internal software and system of the OS. This leads to failed software updates and generally makes the apps incompatible with the system. In this situation, the OS focuses on diagnosing the issue. In order to troubleshoot, the system is forced to go into recovery mode.
There Was Probably an Attempt to Root The Phone
A user may face such issues if they attempt to root Android Smartphones. However, in most cases, the issue arises when the user tries to install custom ROMs. It’s important to understand that in this case, the recovery mode is a part of the process.
Here, the recovery mode does not indicate that there’s an issue or anything. To put you at ease, let’s simplify it. If you are customizing your Android device, for example, by installing customized ROMs, you need to render everything to infuse the additional ROM into the system.
If your phone wants to do this, it has to get into recovery mode and complete the process of rendering. After this, the phone will be rooted or equipped with the customized ROMs.
You Didn’t Update Your Phone in Time
By now you have a basic understanding of why Android OS goes into recovery mode, right?
It’s usually when the system can’t function properly and needs to diagnose its issues. This kind of emergency situation occurs when the system fails to update properly. A system needs to be updated in the right way for it to remain compatible with the rest of the device.
A partial or faulty update makes the system inconsistently aligned with the programming of the OS. In such a situation, the OS goes into recovery mode to solve the issue.
The Power Button is Broken
Up until now, you’ve basically learned how a phone gets into recovery mode on its own. But do you know how to get it into recovery mode?
Yes, by long-pressing the power button. This should tell you why a broken power button can be the reason why your phone keeps going into recovery mode. If the power button is broken, it can either be too loose, disabling the option to power off using the hardware. Or, if the power button breaks while it is pressed, it’ll keep triggering the recovery option even if you leave it idle.
When that happens, the power button is being pressed repeatedly due to the malfunction in the button. The repeated turn on and off that follow is also known as a “boot loop”. During the boot loop, the device is likely to automatically go into recovery mode.
How Can I Get out of Recovery Mode with a Broken Power Button in 3 Simple Steps?
So your Android device is stuck in recovery mode, and there’s nothing you can do about it because of the broken power button. Well, it’s not the end of the world. You can easily get the issue solved within minutes.
The simplest way of doing this is using a PC. Some reboot commands can solve the issue in a jiffy. Well, the process may sound overwhelming but bear with me. If you just pay close attention and are a bit patient, the entire process can save your phone.
Here’s how to fix the phone:
Step 1: Gather the necessary stuff
For this process, you are going to need OEM ADB USB drivers. Just install drivers that are specific to the target phone’s brand. Make sure to back up necessary data and save them in a secure location before you proceed with the next steps. It’ll save you a lot of trouble in the future.
For example, if you have a Samsung phone, you need to download Samsung USB drivers for Samsung devices. Just search for it on Google, and you should find it unless you have a very rare phone.
If you don’t want to take that hassle, here are the devices and the drivers. You can easily download them from this link.
You are also going to need ADB and Fastboot tools as well. These tools are usually included in the Android SDK Platform tool package.
The ADB is about developing and debugging while Fastboot works to flash the system images of the device. This basically cleans the firmware updates or the custom operating system. But mainly, Fastboot is used to unlock the bootloader.
Step 2: Connect the Android device to the PC
Once all the software preps are ready, it’s time to start the process. Begin the operation by simply connecting the faulty device to the PC using a USB cable. Once you are sure that the device is connected, move on to the next step.
Step 3: Verify Reboot and Boot Command
Now comes the challenging part.
Launch a command prompt or PowerShell or terminal window in the folder of the Fastboot and ADB tools. In the command box, type adb devices and press enter. Wait for a while till the device is recognized.
Once your device is listed, type adb reboot and press enter. At this point, the device should begin to restart without any errors.
Finally, once the restarting is done and the device boots back into the Android OS, notice if the boot animation is normal.
And now it’s done. See, it wasn’t that hard!
However, there’re an important thing to remember. This entire process is explained from the perspective of a Windows user. But, if you are using macOS or Linux, the steps are the same. The only difference is, instead of writing adb in the command, you have to insert prefix. In the case of macOS or Linux, just simply replace the adb with ./adb and it should be alright.
For macOS and Linux, it’s also crucial to execute ./adb devices to establish the connection between devices. Apart from this, the rest of the process is the same.
My Final Few Words
Accidents occur on all kinds of devices. Fortunately, technology is now advanced enough to simplify every diagnosing process.
Even a few years back, if you had discovered that your Android device is stuck in recovery mode because of a broken power button, you would have immediately run to a servicing center to get it fixed. But now you can save yourself the hassle and the money by taking care of it at home.
All you need for this is a computer, a USB cable, and the faulty device. With all these at hand, and this article on the screen, you can save your phone literally within minutes.
Leave a Reply